If you’ve ever found yourself in need of a specific baking tool but didn’t want to spend the extra cash to buy it, look no further. In this article, we’ll show you how to create your very own baking tools right in the comfort of your own home. From a homemade pastry brush to a DIY cake leveler, these easy-to-make tools will not only save you money but also bring a sense of satisfaction as you complete your baking projects. So, roll up your sleeves, grab your ingredients, and get ready to put your creativity to the test with these simple DIY baking tools you can make at home.

1. Baking Equipment Basics
When it comes to baking, having the right tools can make all the difference. To help you get started, here are some baking equipment basics that every home baker should have in their kitchen.
1.1 Mixing Bowls
Mixing bowls are an essential tool for any baker. They come in various sizes and materials, but stainless steel and glass bowls are the most common choices. Stainless steel bowls are durable, lightweight, and non-reactive, making them ideal for mixing ingredients. Glass bowls are great for microwaving, as they can handle high temperatures.
1.2 Measuring Cups and Spoons
Accurate measurements are crucial in baking, and having a set of measuring cups and spoons is a must-have. Look for cups and spoons made of sturdy materials like stainless steel or plastic. These tools will ensure that you get precise measurements of dry and liquid ingredients, resulting in the perfect texture and taste of your baked goods.
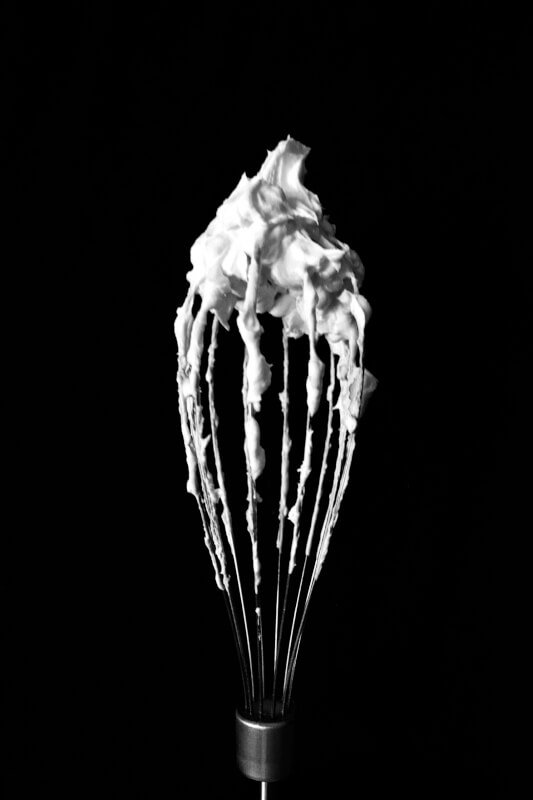
1.3 Whisk
A whisk is used for blending and incorporating air into your ingredients. It’s an essential tool for making batters, whisking eggs, and whipping cream. Whether you choose a balloon whisk or a flat whisk, make sure it’s made of durable materials like stainless steel. Consider opting for a whisk with a comfortable handle for an easy grip.
1.4 Spatula
A spatula is a versatile tool that helps you scrape down the sides of bowls and evenly spread batter into pans. Look for a heat-resistant spatula made of silicone, as it won’t melt or warp when exposed to high temperatures. Silicone spatulas are also flexible, allowing you to fold ingredients without damaging delicate mixtures.
1.5 Rolling Pin
Rolling pins are essential for shaping dough and rolling out pastry. A traditional wooden rolling pin is the most common choice, but you can also find them in other materials like marble or stainless steel. Choose a rolling pin that feels comfortable in your hands and has a smooth surface to prevent sticking.
2. Homemade Cake Tester
Testing cakes for doneness is a crucial step in baking. While there are specialized tools like cake testers available in the market, you can also make your own at home with simple items.
2.1 Paperclip Cake Tester
A paperclip can serve as a makeshift cake tester. Straighten out a metal paperclip and insert it into the center of the cake. If it comes out clean, without any crumbs or wet batter sticking to it, your cake is ready. Remember to wash the paperclip thoroughly before and after each use.
2.2 Wooden Skewer Cake Tester
Another option for a homemade cake tester is a wooden skewer. Similar to the paperclip method, insert a wooden skewer into the center of the cake. If it comes out clean, your cake is baked to perfection. Wooden skewers are disposable, so you can easily discard them after use.
3. DIY Piping Bag
Piping bags are commonly used for decorating cakes and pastries with icing or frosting. If you don’t have a piping bag on hand, don’t worry! You can easily make your own at home with items you probably already have in your kitchen.
3.1 Plastic Bag Piping Bag
A plastic bag can be transformed into a piping bag with a few simple steps. Fill a sturdy, freezer-safe plastic bag with your icing or frosting, then cut a small hole in one corner. Squeeze the bag gently to pipe the desired design onto your baked goods. This method works well for basic piping techniques and is easy to clean up afterward.
3.2 Parchment Paper Piping Bag
If you prefer a more eco-friendly option, a parchment paper piping bag is a great alternative. Cut a triangle of parchment paper, fold it into a cone shape, and secure it with tape or a metal paperclip. Fill the cone with icing, then twist the open end to create pressure for piping. This method allows for more precision in your designs and is also easy to clean up.
4. Pastry Brush Alternatives
Pastry brushes are commonly used to apply egg wash, butter, or glaze to baked goods. If you don’t have a pastry brush, there are several alternatives you can use to achieve similar results.
4.1 Silicone Brush
A silicone brush is a great alternative to a traditional pastry brush. Silicone brushes are heat-resistant, easy to clean, and won’t shed bristles like some traditional brushes. The flexible bristles allow for even distribution of liquids and are perfect for applying a thin, even coat of glaze or egg wash to your baked goods.
4.2 Basting Brush
If you have a basting brush in your kitchen, it can easily be used as a substitute for a pastry brush. Basting brushes are typically used for applying marinades or barbecue sauce to meats, but they work just as well for applying glazes or butter to pastries. Make sure to clean the brush thoroughly before using it for baking.
4.3 Unused Toothbrush
In a pinch, an unused toothbrush can be repurposed as a pastry brush alternative. Use a toothbrush with soft bristles and make sure it’s thoroughly cleaned before using it for baking purposes. This method works best for lightly brushing flour off pastries or for creating a textured effect on dough.

5. Baking Stone Substitute
Baking stones, also known as pizza stones, are great for achieving crispy crusts on bread and pizza. However, if you don’t have a baking stone, there are a couple of alternatives you can use.
5.1 Unglazed Ceramic Tiles
Unglazed ceramic tiles can be used as a substitute for a baking stone. Simply place the tiles on the oven rack and preheat them along with the oven. The tiles will absorb and distribute heat, creating a similar effect to a baking stone. Just make sure the tiles are clean and food-safe before using them for baking.
5.2 Pizza Stone
If you have a pizza stone, you’re in luck! Pizza stones can also be used as a baking stone substitute. Place the pizza stone in the oven and preheat it before baking your bread or pizza. The pizza stone will absorb and retain heat, giving you a crispy crust.
6. Cooling Rack Alternatives
After baking, it’s important to let your goods cool properly to prevent them from becoming soggy. If you don’t have a cooling rack, here are a few alternatives you can use.
6.1 Wire Cookie Cooling Rack
If you have a wire cookie cooling rack, it can double as a general-purpose cooling rack. Simply place the rack on a heat-resistant surface and transfer your baked goods onto it. The wire grid allows for air circulation, promoting even cooling.
6.2 Oven Rack
In the absence of a dedicated cooling rack, you can use the oven rack as an alternative. Place a clean, heat-resistant surface such as a baking sheet or cutting board on the oven rack, then transfer your baked goods onto it. Make sure to leave enough space between the items for air to circulate.
6.3 Wire Grilling Rack
Another alternative is a wire grilling rack, often used for barbecuing. These racks are designed to allow air circulation, making them suitable for cooling baked goods. Place the grilling rack on a heat-resistant surface and transfer your freshly baked treats onto it.

7. Homemade Bread Lame
A bread lame is a tool used to score bread before baking, allowing it to expand properly during the baking process. If you don’t have a bread lame, don’t fret! You can easily make a homemade version with items you probably already have at home.
7.1 Ruler and Razor Blade Lame
One simple option is to use a ruler and a disposable razor blade as a bread lame. Hold the ruler against the dough to guide your cuts, and carefully use the razor blade to make the desired score marks. Make sure to take caution and handle the razor blade with care.
7.2 Chopstick and Box Cutter Lame
Another homemade bread lame option is to use a chopstick and a box cutter. Slide the blade of the box cutter into the hollow end of the chopstick, making sure it’s securely attached. Just like with the ruler and razor blade method, use the chopstick as a guide to score the bread.
8. DIY Pie Weights
Pie weights are used to prevent the crust from puffing up during blind baking. If you don’t have pie weights, you can easily create your own with simple household items.
8.1 Dried Beans or Rice
Dried beans or rice can be used as a substitute for pie weights. Simply line your pie crust with parchment paper or aluminum foil, then fill it with dried beans or rice. The weight of the beans or rice will hold down the crust during baking. Once the crust is baked, let the beans or rice cool completely before storing them for future use.
8.2 Aluminum Foil and Sugar
Another alternative is to use aluminum foil and granulated sugar. Line your pie crust with aluminum foil, pressing it against the sides of the crust. Fill the foil with granulated sugar to weigh it down during baking. The sugar will help distribute the heat evenly and prevent the crust from bubbling up.

9. Homemade Sifter
Sifting dry ingredients is essential for achieving a smooth texture in your baked goods. If you don’t have a sifter on hand, don’t worry! You can easily make your own makeshift sifter at home.
9.1 Colander Sifter
A colander can double as a makeshift sifter in a pinch. Simply place your dry ingredients in the colander and gently tap or shake it to sift the ingredients through the holes. Make sure to use a colander with small holes to achieve a finer sift.
9.2 Fine Mesh Strainer
Another alternative is to use a fine mesh strainer as a makeshift sifter. Place your dry ingredients in the strainer and gently tap or shake it to sift the ingredients through the mesh. This method works best for sifting smaller quantities of dry ingredients.
10. Cake Stand Replacement
A beautiful cake deserves a stunning presentation, but you don’t necessarily need a fancy cake stand to achieve that. Here are a couple of alternatives you can use to display your masterpiece.
10.1 Upside-down Bowl
An upside-down bowl can easily be transformed into a makeshift cake stand. Choose a bowl that is sturdy and stable, then place it upside down on your serving surface. The flat bottom of the bowl will provide a stable base for your cake, allowing it to be showcased with elegance.
10.2 Stacked Books
If you’re feeling creative, you can use stacked books to create a unique cake stand. Choose hardcover books with similar heights and stack them on top of each other. Make sure the stack is stable and secure before placing your cake on top. This method allows for customizable height and adds a touch of whimsy to your presentation.
In conclusion, with a little creativity and resourcefulness, you can create your own baking tools and substitutes at home. From makeshift piping bags to DIY pie weights, there are countless ways to achieve professional-level baking results without breaking the bank. So roll up your sleeves, gather your materials, and get ready to embark on your baking adventure armed with these simple DIY tools!

